Sunday 15 July 2012

Alooparatha and Aloopuri

When it rains, I like my meals piping hot and savoury.

True, it hasn't been raining as much as July should, but my tastebuds expect fried goodness this time of the year, so the same rice and daal and curries that were delicious just last month seem bland and pointless and vaguely disheartening now.

To soothe them and be nice to myself, I thought I'd make alooparatha. But, my chief complaint about aloo paratha is that it isn't quite as crispy or deep-fried or yummy as my favourite form of the stuffed Indian flatbread -- pooris. Now, I know people say potato is a difficult stuffing to handle when rolling the stuffed pockets of dough out, which is why one should stick to the safer paratha option, but I wasn't going to let a little thing like received wisdom stop me, was I? Not me!

So I didn't, and though the rolling out did take some patience, I had two lovely, lovely golden pooris to prove my point. Here's the picturebook :-)

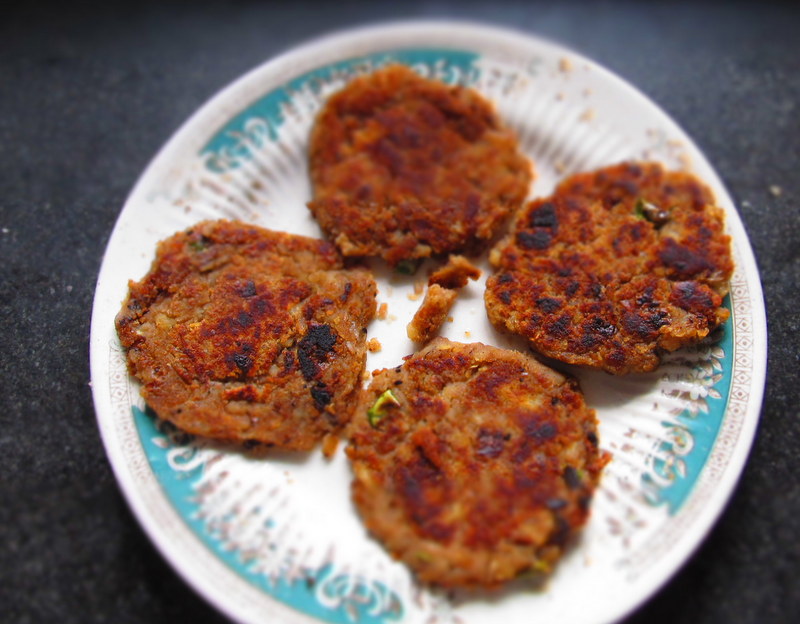
Boiled and skinned potatoes.

Seasoned with chopped onions, coriander leaves, salt and pepper. One can add more herbs if one likes, and perhaps some ginger, but I stick to the basics.

Mash it all together. 

Roll little bits in between your palms to make smooth potato balls.
 
Put these inside thick cups of dough, made by mixing whole wheat flour, a little white oil, salt, touch of sugar, and slightly warm water.

Pull up the sides of the cups and seal them together at the top. Now dust it in flour and roll it out carefully.

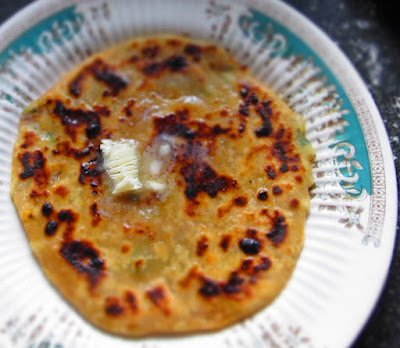
The rolling needn't be that careful if you're making parathas. Shallow-frying doesn't need a smooth surface.

But deep frying does. Hence the perfectly shaped and carefully rolled-out pooris.

Touch of butter, for autheticity.

A little for the pooris too :-)

Monday 9 July 2012

Strawberry Mint Jam


I am not a fan of the sweet stuff, unless it's good old milk and cottage-cheese based Bengali sweets. I'm especially averse to sweetness at breakfast. Cornflakes, fancy cereal and jam-on-toast have no place at my table. Indeed, the one time I was gifted a box of rather exotic breakfast cereal, I ate it as dessert. With warm milk and honey. Perfect for lulling you to blissful sleep.

Unfortunately, I don't always have sole and full control over my table. Occasionally, I'm forced to share it with people, and these people take to sugary breakfasts like a parched duck to water. And gradually, in their company, I've learnt to appreciate the delights of such easily-made meals as a glass of milk and homemade fruit-jam on toast.Only, of course, I'm lactose intolerant, so the milk had to go. And the jam-toast comes after my usual savoury breakfast, as a sort of sweet-afters, because there's no way I'm actually breaking fast with a mouthful of sugar.

So then, since it's strawberry season in the northern hemisphere, and strawberries make my favourite kind of jam -- tart, yet sweet, with a refreshing, wake-up-sleepyhead! after-tase -- here's the picturebook for an easy, three-step, homemade strawberry jam! Say goodbye to the preservatives and plastic packets, people!

NOTE: Since strawberries are far from abundant where I now live, I had a friend make me this batch. The shots are from his kitchen.

That's a kilo of strawberries, three large lemons, mint/pudina leaves, and sugar.

Step 1: Clean the leaves, roughly grind them, simmer the coarse paste in hot water in a covered saucepan, drain the infusion, and cool it.

Step 2: Add the cleaned and diced strawberries to a thick-bottomed wok or saucepan (this one's cast iron). Stir as the juices release, and simultaneously mash the softening fruit, so there are no large chunks in the jam. 

Step 3: When most of the strawberries are mashed into a more or less even consistency, raise the heat to medium-high. Let the fruit bubble. When it does, add 2 cups of sugar. Keep stirring till it dissolves. Then, add the juice of two lemons. Fold it in well. Let cook for five minutes. 

Now, taste. Take your time. Blow on the spoon or the edge of the spatula, wherever you test-taste rests, and let it cool till you touch your tongue to it. No point risking your tastebuds. Then, carefully savour the flavour. It is too tart? Is it too sweet? For me, two cups of sugar is usually a little more than enough, but you might like your jam sweeter. Depending upon personal preference, add sugar or lemon juice. When you're happy with the flavour, turn the heat back up. My friend used a candy thermometer (such fancy gadgets these Western kitchens have, eh?) to see if the temp is stabilised at 100C. That's apparently the temp. to aim for, if you want your jam to set*. Let it do the bubbly-boil at this temp. for about ten or twelve minutes.

If you like, to this mass, you can now add a handful of strawberries, diced. It'll give a certain chunky, fresh tartness to your jam :-)


Step 4: Turn off the heat. Let the hot jam cool a little -- say about ten minutes. Then, pour the mint extract into it, and mix thoroughly, and very quickly. Transfer the jam to clean mason jars, leaving about two inches of air at the top. Seal the jars. My great aunt said it's a good idea to put the mason jars in a jolshora -- or a water-bath -- before you scoop the jam into it, but I've done it without the jolshora, and my jar hasn't exploded, so I suppose you could skip if you like. Put the jars straight into the fridge!

Homemade strawberry mint jam on toast. As delicious as it gets!

This basic recipe works equally well for other berries and fruits, but use the mint judiciously. It's not a flavour that goes well with everything. But before the summer's over, do give your own jam a try. It's easy, relatively quick, and makes for lovely and thoughtful gifts :-)

*About setting though, be warned. Organic strawberry jam will never achieve a wobbly, jelly-like consistency unless you add things to it you probably shouldn't be feeding yourself. A good way of testing for setting, my friend said, is to put a plat in the fridge, then drop a teaspoon of bubbling jam on this plate, and put it back in the fridge. If it sets in a minute, your jam is done! Ta-daaa! If not, let it boil till it does. Twelve to fifteen minutes does it.

Monday 2 July 2012

Red Bean Burger

Now that red meat is officially off my diet -- except maybe the occasional mutton biryani -- I had to hunt down reasonable substitutes for my tikias/tikkas and burgers (which, when you think about it, are basically the same things, only the former are seasoned better, and therefore far more delicious :-). Anyway, beans/daal are the most obvious animal protein sub., and since I had a handful of rajma (red kidney beans) leftover from... oh, I don't know, months ago, I decided to sacrifice them to the cause.


First, as always -- and especially in these  times of elevated chemical-content in produce and grocery -- I washed the rajma thoroughly, and then left them soaking from early morning till after lunch in hot water. Not warm. Hot. Bubbly-boiling water. Why should you do this? You should do this because taking chances is silly. The second-last batch of rajma I made tasted slightly bitter. The smell was a bit off, too. So when I made it again, I stopped right the rajma has been pressure-cooked to softness, and smelt the soupy bean-stock. And yes, there was that extra-dark brown colour you couldn't get naturally, the odd, un-placeable smell. So I chucked the stock, washed the beans thoroughly, and started from scratch. This time onwards, I was going to carefully right from the outset.

So! You soak well-washed beans in hot water. If you can remember to do this, drain this water after a few hours, give the beans another quick wash, and soak them in warmish or room-temp. water till late afternoon. Then, when the beans are plump and shiny, follow the steps below :-)

Lightly saute minced ginger, garlic and thinly-sliced red onion in a teaspoon of mustard oil, on a low flame. Add the washed and soaked beans to the pot/pressure cooker, toss, add water, and cook till they're soft.

Test the tenderness of beans with a fork. They must be mushy enough to be mashed.

Follow through to the logical conclusion. Mash them.

Mix in salt, a boiled potato, half a teaspoon of cumin powder, and chopped green chilies. But you can leave the last out if you don't like 'em.

Pat them into standard burger/tikia shapes, not too thick, or the insides will remain all bland boiled beans and potato.

Either grill them, or fry them on a lightly greased skillet. Unless you're exceptionally healthy and on a regular exercise regimen, please use white oil.

The tikias! Now, you can eat these straight away with a salad, or sprinkled with lemon juice. They're delicious!

Or, you could cut yourself a couple of slices from a ripe, firm tomato, slice through the middle of a (toasted) bun.

[Lather it with cream cheese or mayo :-] Layer the tomatoes on top of it.

Top with the tikia/burger. [Similarly lather the other half of the bun]

Maybe add some onions. And cucumber. And lettuce. And pickles. And whatever else you want.

[Maybe even a pat of that cream-cheese or mayo]

Aaaaaand, voila! Your totally healthy, no-cheese, no-mayo [brackets not included], tomato-and-other-veggie-laden burger is ready. 
If you're going to complain about the potato in the mix, go run yourself a mile after you've stuffed one of these down your gullet. It's good for you.

All the rest of you happy people, save this recipe. You might have thought the old rajma had no future beyond rajma-chawal or the occasional hearty, soupy winter dish, but man. I'm telling you. It makes a killer tikia. If you're vegetarian for ethno-religious reasons and can't bring yourself to bite into a standard-issue meat-inna-bun, but (rightly) despise the aloo-tikia they serve in the burger-chains instead, make yourself a whole batch of these burgers and freeze 'em. They're incredibly handy, fry in under two minutes, and are a filling and lip-smacking meal in less than five. Especially if you stuff the bun with crisp, fresh vegetables. 

Also, for the worker-bees and parents of school-going children: this makes an amazing packed lunch. Try it! You'll keep coming back to it :-)